Building a video editing pipeline for my YouTube channel
I recently started a YouTube channel where I review ice cream and tiramisù in different places I visit around the world. From the start, I wanted to automate all the boring editing, partly because I’m not used to it and learning proper editing tools would take me significantly longer.
As a software developer, with Claude’s help this was easier to just build myself.
Audio processing
On the audio side I wanted to apply the following:
- Noise attenuation and voice enhancement, because I’m recording the videos on the spot simply with my iPhone and no professional microphones at the moment
- Automatically remove swear words with bleeps. This was more of a fun exercise to test how good ML models are at doing this rather than a real need.
This is the final script I produced:
uv run process_video.py input.mov -s 0.8 --bleep-word shitThe parameter -s 0.8 determines the intensity of denoising and the parameter --bleep-word determines what words to automatically bleep.
Noise attenuation and voice enhancement
I looked for a local ML model that could leverage MLX in order to take advantage of Apple Silicon, so this part has been done with a Python script.
mlx-audio is a suite of audio processing tools that can take care of all of this while performing well thanks to hardware acceleration.
I always rely on uv as a Python package manager and virtual environment manager.
Here is the full function that performs the following pipeline:
- Extract the audio track with
ffmpeg - Run the ML model to apply the enhancements
- Normalize the audio track to keep a good peak volume
def denoise_audio(
    input_path: Path, strength: float, audio_in: str, audio_out: str,
    length: float | None = None,
) -> str:
    print("[denoise] Extracting audio...")
    cmd = ["ffmpeg", "-y", "-loglevel", "error", "-i", str(input_path),
           "-vn", "-ar", "48000", "-ac", "1"]
    if length is not None:
        cmd += ["-t", str(length)]
    cmd.append(audio_in)
    _run(cmd)
    print("[denoise] Running model...")
    model = DeepFilterNetModel.from_pretrained()
    original, sr = audio_io.read(audio_in, always_2d=False, dtype="float32")
    enhanced = model.enhance_array(original)
    blended = np.clip(strength * enhanced + (1.0 - strength) * original, -1.0, 1.0)
    peak = np.max(np.abs(blended))
    if peak > 0:
        blended = blended / peak * 0.99
    print("[denoise] Normalized.")
    audio_io.write(audio_out, blended, sr)
    print("[denoise] Done.")
    return audio_out
Automatic bleep of swear words
To find the words to bleep I’m running Whisper, which transcribes the audio with word-level timestamps.
def _find_word_segments(
    audio_path: str,
    target_words: set[str],
    model_name: str,
    pad: float = 0.05,
) -> list[tuple[float, float]]:
    from mlx_audio.stt import load as stt_load
    from mlx_audio.stt.utils import load_audio

    print(f"[bleep] Loading Whisper model: {model_name}")
    model = stt_load(model_name)

    # MLX community models often omit processor files; fall back to the matching openai/ model.
    if getattr(model, "_processor", None) is None:
        from transformers import WhisperProcessor
        base = model_name.split("/")[-1]  # e.g. "whisper-large-v3-turbo"
        fallback = f"openai/{base}"
        print(f"[bleep] Processor missing, loading from {fallback}...")
        model._processor = WhisperProcessor.from_pretrained(fallback)

    print("[bleep] Running transcription with word timestamps...")
    audio_mx = load_audio(audio_path)
    result = model.generate(audio_mx, word_timestamps=True, language="en", verbose=False)
    segments: list[tuple[float, float]] = []
    for seg in (result.segments or []):
        for w in seg.get("words", []):
            word_clean = w["word"].strip().lower().strip("\"'.,!?;:-")
            if word_clean in target_words:
                segments.append((max(0.0, w["start"] - pad), w["end"] + pad))
    return segments
Video processing
On the video side, I wanted to add an overlay to show
- the rating, from 1 to 5, with steps of 0.5
- map icon pin
- name of the place
- the city and country
- an icon to determine if the video is about ice cream or tiramisù
I chose to use the Super Mario stars as the rating, so a rating of 4.5 would equal to 4 full stars and 1 half star. For the location I’m using the classic map pin and for the icons I asked Gemini to generate them based on the initial avatar I created for the website.
I created a simple UI to facilitate the process rather than calling the CLI manually, with the advantage of seeing the rendered overlay instantly.
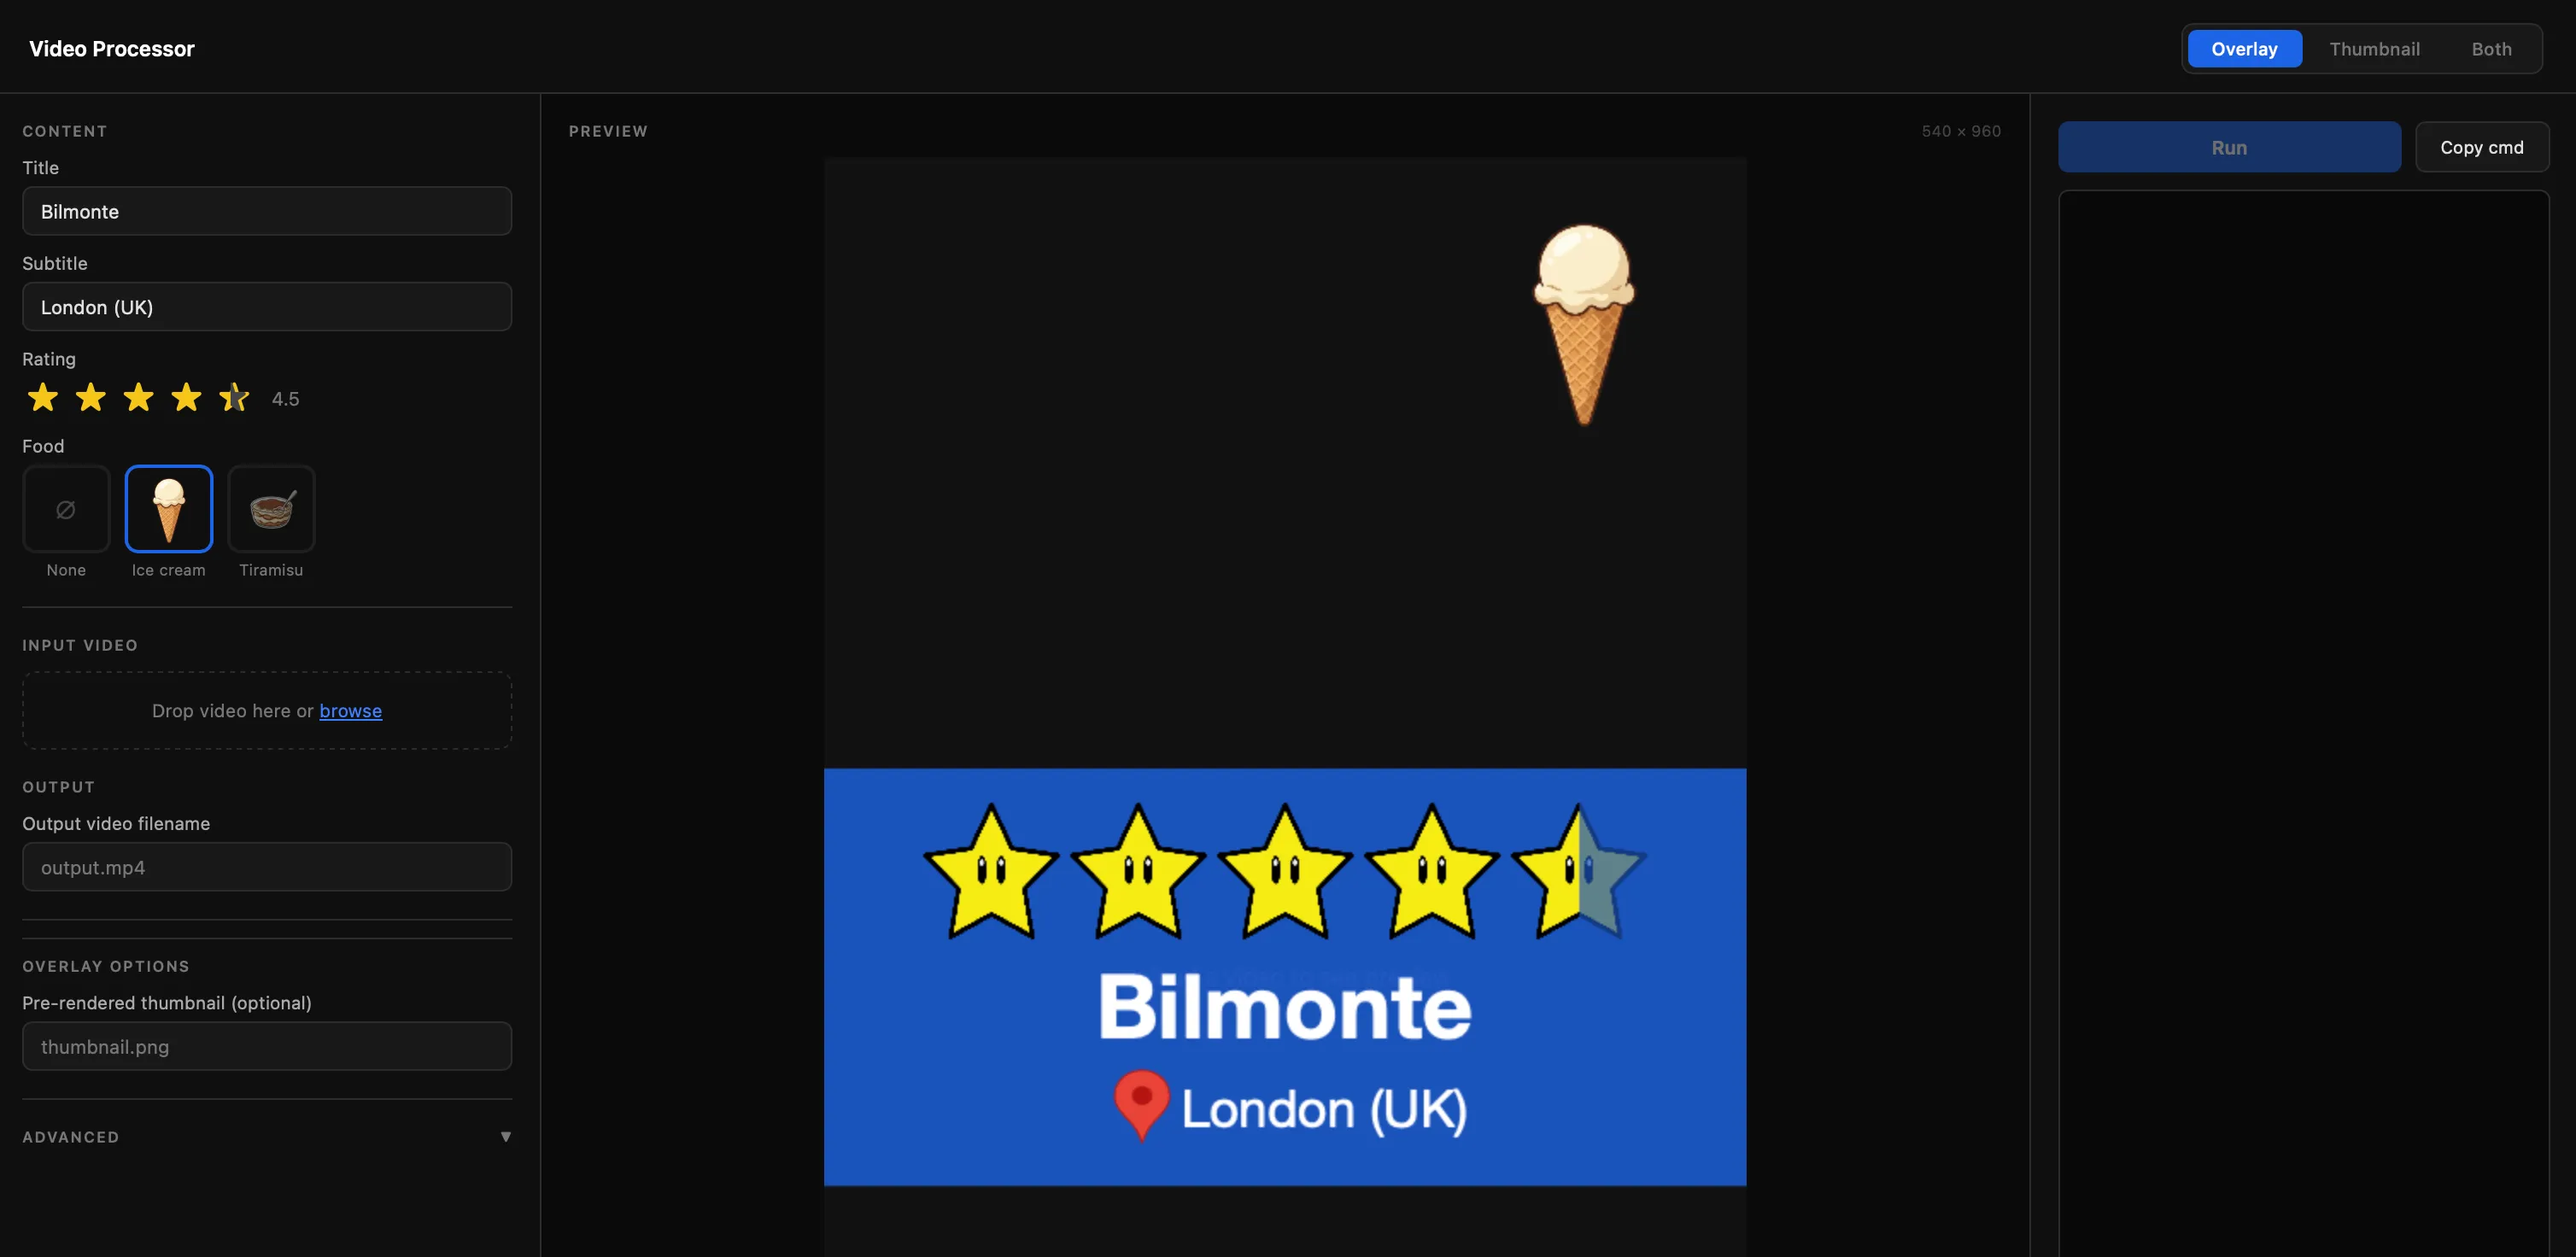
Behind the scenes, I use canvas (node-canvas) to render the various elements of the overlay and ffmpeg to mux the canvas together with the video, frame by frame.
import { createCanvas, loadImage } from "canvas";

// canvas rendering of overlay elements
function renderFrame(f) {
  const opacity = overlayOpacity(f);
  const canvas = createCanvas(W, H);
  if (opacity <= 0) return canvas.toBuffer("raw");

  const ctx = canvas.getContext("2d");
  ctx.save();
  ctx.globalAlpha = opacity;
  // background
  ctx.fillStyle = BLUE;
  ctx.fillRect(0, containerY, W, containerH);
  // render all the other elements ...
  return canvas.toBuffer("raw");
}

// spawn ffmpeg and pipe the overlay canvas
const ff = spawn("ffmpeg", ffArgs, { stdio: ["pipe", "inherit", "pipe"] });

// find video duration
const probeJson = execSync(
  `ffprobe -v quiet -print_format json -show_streams "${resolve(ROOT, inputVideo)}"`,
  { encoding: "utf8" },
);
const videoStream = JSON.parse(probeJson).streams.find(
  (s) => s.codec_type === "video",
);
const TOTAL_FRAMES = Math.ceil(parseFloat(videoStream.duration) * FPS);

for (let f = 0; f < TOTAL_FRAMES; f++) {
  const buf = f === 0 && frame0Buf ? frame0Buf : renderFrame(f);
  const ok = ff.stdin.write(buf);
  if (!ok) await new Promise((r) => ff.stdin.once("drain", r));
}
This is the final result:

This pipeline saves me a lot of time on every video and I have plans to further integrate it with a website where I will collect all the reviews.