Hosting my website on an RPi 5

Why such a complex setup to host a simple website? 😅
I know there are plenty of services that can host a static website for free, but since I had an RPi 5 at home with spare capacity, I decided to do this mostly for fun and to play around with some tools.
The website will be hosted on a RPi 5 at home where I have no public static IP and no ports exposed on the public internet.
I want to maintain a good DX: make edits on my MacBook, push them to GitHub and that should trigger a new deployment without accessing the RPi directly, like a proper CI/CD setup.
Domain setup
I bought the domain mtt.engineer on Cloudflare, which is also handling the nameservers and allows me to point the domain A record to a Cloudflare Tunnel.
This is how the DNS record should look if it’s correctly proxied to the tunnel.

RPi 5 setup
I have a RaspberryPi 5 with M.2 HAT + 256GB SSD connected via ethernet to my home network and I bought an external multi USB-C power adaptor as I have other RPis powered at the same time.
I’m using the standard Raspbian OS where I additionally installed git, docker, and cloudflared.
sudo apt-get update
sudo apt-get install git docker cloudflared
To set up the tunnel with cloudflared, I used the local managed tunnel mode by running cloudflared tunnel create website, where website is the name of my tunnel, and then followed the setup instructions.
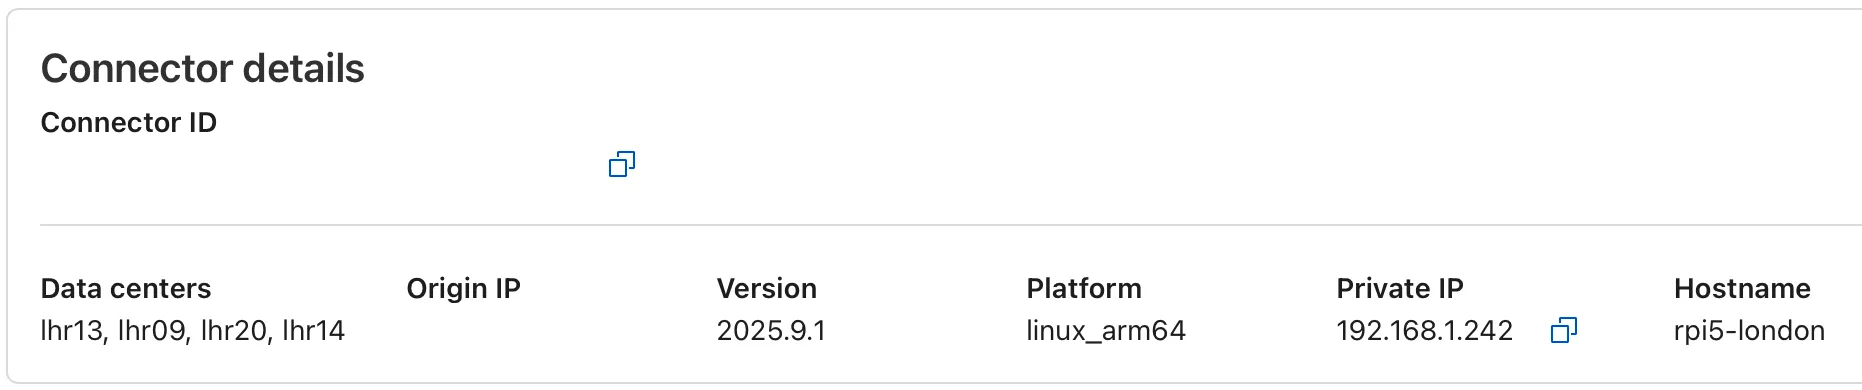
Once everything has been set up correctly, you can verify that the tunnel is up and running on your Cloudflare dashboard.
Cloudflare is also configured to leverage stale-while-revalidate and serve cached responses when the origin is down.
Simplest CI/CD
One of the requirements is to not expose the RPi to the public internet directly, so I can’t have webhooks from GitHub reach the RPi when I push new code.
I briefly explored Woodpecker CI, but it requires a public redirect_url for OAuth authentication, which seemed overkill.
So I went with a polling solution that checks every 5 minutes for new updates by comparing the local main and remote origin/main SHA1.
If they don’t match we trigger the build of the new image and deployment.
Since the Cloudflare default cache TTL is 2 hours, I need to purge the cache to see changes immediately.
Once the operation is successful, it sends me a message via a Telegram bot.
#!/bin/bash

cd /home/mattia/mtt.engineer
git fetch origin main

ORIGINAL_COMMIT=$(git rev-parse HEAD)
LOCAL=$(git rev-parse main)
REMOTE=$(git rev-parse origin/main)
TOKEN="" # telegram token
CHAT_ID="" # telegram chat_id
ZONE_ID="" # cloudflare zone_id
CLOUDFLARE_TOKEN="" # cloudflare API token

if [ "$LOCAL" != "$REMOTE" ]; then
  # pull latest changes
  git pull
  # rebuild docker image
  if ! docker build -t mtt-engineer .; then
    # if it fails reset to the original commit
    git reset --hard "$ORIGINAL_COMMIT"
    MESSAGE="❌ Failed to update website mtt.engineer"
    curl -s -X POST https://api.telegram.org/bot$TOKEN/sendMessage \
      -d chat_id=$CHAT_ID \
      -d text="$MESSAGE" > /dev/null
    exit 1
  fi
  # stop running container and start with the latest image
  docker stop mtt-engineer
  docker rm mtt-engineer
  docker run -d -p 3000:3000 \
    --restart unless-stopped \
    --name mtt-engineer mtt-engineer:latest
  # all good send a message
  MESSAGE="✅ Website mtt.engineer updated!"
  curl -s -X POST https://api.telegram.org/bot$TOKEN/sendMessage \
    -d chat_id=$CHAT_ID \
    -d text="$MESSAGE" > /dev/null
  # purge cloudflare cache
  curl https://api.cloudflare.com/client/v4/zones/$ZONE_ID/purge_cache \
    -H 'Content-Type: application/json' \
    -H "Authorization: Bearer $CLOUDFLARE_TOKEN" \
    -d '{"purge_everything": true}'
fi
Finally, create a cron job that runs every 5 minutes. Since the Docker commands require sudo, you must add this job to the root user’s crontab.
sudo crontab -e
# add these lines at the end
*/5 * * * * /home/mattia/check-website-github.sh
I also needed to run this so Git accepts that the repo directory isn’t owned by root.
sudo git config --global --add safe.directory /home/mattia/mtt.engineerIf all goes well I get a nice confirmation with my Telegram bot.

All the code is available on my GitHub https://github.com/mtt87/mtt.engineer